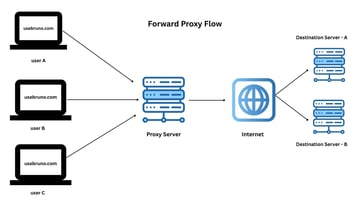
A proxy is a simple server that sits between your device and the internet. It acts as a middleman,...
Running Ollama Locally and Talking to it with Bruno
Large Language Models (LLMs) are becoming increasingly accessible, and platforms like Ollama make it easier than ever to run these powerful models locally. Combining Ollama with Docker provides a clean and portable way to manage your LLM environment, and using an API client like Bruno allows you to interact with your running models effortlessly.
This guide will walk you through setting up Ollama within Docker and using Bruno to send requests to your local LLM.

Why Docker for Ollama?
Docker offers several benefits when running Ollama:
1. Isolation: Keeps your Ollama installation and its dependencies separate from your host system, preventing conflicts.
2. Portability: Easily move your Ollama environment to different machines.
3. Consistency: Ensures your Ollama setup is the same every time you run it.
4. Dependency Management: Simplifies managing the dependencies required by Ollama.
Why Bruno?
Bruno is an open-source, Git-friendly, and popular API client that provides a clean and intuitive way to design and test APIs. It uses a plain-text markup language (bru) for storing API collections, making them easily versionable and shareable. For interacting with Ollama's API, Bruno offers a user-friendly interface to construct and send requests.
Prerequisites
Before you begin, make sure you have the following installed:
1. Docker
2. Bruno
Step 1: Running Ollama in Docker
Ollama provides official Docker images, making it straightforward to get started.
1. Pull the Ollama Docker Image: Open your terminal and run the following command:
docker pull ollama/ollama
2. Run the Ollama Container: Now, start the Ollama container. We'll map port 11434 on your host machine to the same port in the container, as this is the default port Ollama listens on. We'll also use a named volume to persist the models you download.
docker run -d -v ollama:/root/.ollama -p 11434:11434 --name ollama ollama/ollama- -d: Runs the container in detached mode (in the background).
- -v ollama:/root/.ollama: Creates a named volume `ollama` and mounts it to `/root/.ollama` inside the container. This is where Ollama stores models, ensuring they persist even if you remove the container.
- -p 11434:11434: Maps port 11434 on your host to port 11434 in the container.
- - name ollama: Assigns the name ollama to your container for easy identification.
- ollama/ollama: Specifies the Docker image to use.
Step 2: Downloading a Model
With the Ollama container running, you can download a model. You can do this from the host machine using the Ollama CLI *if* you have it installed and configured to talk to the Docker container, or you can execute the command within the container. Let's do the latter for simplicity.1. Exec into the Ollama Container:
docker exec -it ollama ollama pull tinyllama- docker exec -it ollama: Executes a command inside the `ollama` container interactively.
- ollama pull llama2: This is the command run inside the container to download the `llama2` model. You can replace `llama2` with any other model available on Ollama's library.
This will download the llama model into the persistent volume.
Step 3: Talking to Ollama with Bruno
Now that Ollama is running with a model loaded, let's use Bruno to send requests.1. Open Bruno: Launch the Bruno application.
2. Create a New Collection: Click on "Create Collection" and give it a name (e.g., "Ollama API"). Choose a location to save the collection.
3. Add a New Request: Right-click on your newly created collection and select "New Request".
4. Configure the Request:
- Method: Choose `POST`. Ollama's API for generating responses uses the POST method.
- URL: Enter http://localhost:11434/api/generate. This is the endpoint for generating text completions.
- Body: Select the `JSON` tab and enter the following JSON body. Replace `"tinyllama"` with the name of the model you downloaded if it was different.
{
  "model": "tinyllama",

  "prompt": "Explain about Bruno the api client?",

  "stream": false
}- model: Specifies the model you want to use.
- prompt: The input text you want the model to respond to.
- stream: Set to `false` for a single, complete response (you can set this to `true` to receive the response in chunks).
5. Send the Request: Click the "Send" button.
You should see the response from the tinyllama model in the "Response" panel of Bruno.

Exploring Other Endpoints
Ollama's API has other useful endpoints you can interact with using Bruno:
- List Models: GET http://localhost:11434/api/tags - Lists the models available on your Ollama instance.
- In Bruno, create a new GET request with this URL.
- Chat: POST http://localhost:11434/api/chat - Allows for multi-turn conversations.
The JSON body for this endpoint is more complex and involves an array of messages. Refer to the Ollama API documentation for the exact structure.
Conclusion
Running Ollama in Docker provides a robust and maintainable environment for your local LLMs. Coupled with Bruno's intuitive API client, you have a powerful setup for experimenting with and integrating LLMs into your workflows. This approach allows you to easily manage different models, test prompts, and build applications that leverage the capabilities of these powerful language models.
Learn more about Bruno:
- Explore our docs: https://docs.usebruno.com/
- Join the conversation: Ask questions in our Discord community.


